
The form builder in Second Door lets you create digital intake forms. You control what you collect, which questions are required, and what logic determines which questions each patient sees.
How to get to your Triage forms
Your triage form is the one(s) that your patients will fill out during any Request Appointment or Self-Scheduling forms via your website. Those questions and answers flow in to the Triage section of the lead card to give you context ahead of the patient's visit and they ensure the patient is scheduled with the right provider at the right location that provides the services they need.
- On the main dashboard in Second Door, click Triage.
- If you have multiple Triage forms, you likely want the one where status = Published.
- If your Triage is titled "Legacy", email support@seconddoorhealth.com to upgrade your Legacy Triage in order to enable you to modify it using the instructions below.
How to get to your Intake forms
Your intake forms are the ones you'll send to patients after they've booked, but before they've attended, their Initial Evaluation.
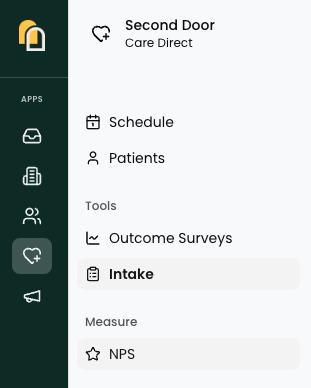
- Click the Care Direct icon in the left sidebar (the heart icon).
- Select Intake.
This opens the Intakes list, where you see all your forms, their status, and when they were last submitted.
Edit an existing form
To edit an existing form, click the three-dot menu on the form list and select Edit.
How to create a new form

- Click + New Intake at the top right (or + New Triage)
- Select Create from Scratch. You can upload existing forms that our system will convert to the best of its ability. This article content can be used to learn how to modify the content of imported forms.
You'll land in the builder with a blank step ready for questions. The left side has buttons for adding questions, creating rules, and setting up scoring. The right side shows the form you're building, where you configure each question's settings.
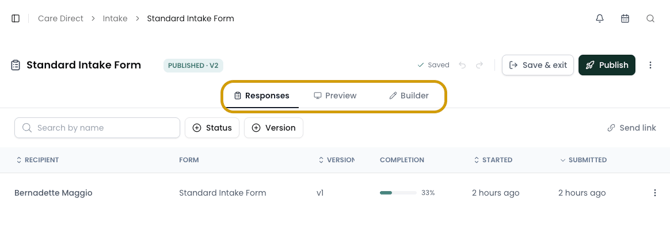
At the top, three tabs let you switch between Builder, Preview, and Responses.
How to add questions to your form
- Click the Builder tab inside your Intake form.
- Click the Add Question button on the left side (the shapes icon).
- Choose a question type.
- Drag it into your form on the right and drop it where you want it.
Available question types:
| Type | What it does |
|---|---|
| Short text / Long text | Free-response fields. Use short text for names and IDs; long text for open-ended answers. |
| Number | Numerical input only. Good for pain scales. Don't use for alphanumeric values like insurance IDs — use a text field instead. |
| Date | Date picker. |
| Yes or No | Simple toggle. |
| Single select / Multi-select | Pick one or pick many from a visible list of options. |
| Dropdown / Multi-select dropdown | Same as above, displayed as a dropdown menu. |
| Star rating | Stars or numbered boxes. Customizable max value and end labels (e.g., "Not at all" to "Extremely"). |
| File upload | Patient uploads a document or image. See How to collect documents from patients below. |
| Address | Structured address field. |
| Signature | Electronic signature on a legal document. See How to add electronic signatures below. |
| Embed a video | Not a question. Places a hosted video (YouTube, Vimeo, Loom) into the form — like a clinic welcome video. |
How to configure a question
- Click the pencil icon on any question (or select Edit from its overflow menu).
- The settings panel opens on the right.
Common settings:
| Setting | What it controls |
|---|---|
| Required | Patient must answer before submitting. |
| Visible by default | Uncheck to hide the question, then reveal it conditionally with a rule. |
| Question name | Internal label your team sees in the builder and in responses. |
| Help text | Guidance shown below the question (e.g., "Please enter the name as it appears on your insurance card"). |
| Input type (text fields) | Controls formatting: email address, phone number, Social Security number, URL, date, range (slider), and others. |
Note: By default, questions don't display their own title to the patient — the form uses the step name instead. This looks clean when you have one question per step (the most common setup). If you put multiple questions in the same step, click Add Label on each one so patients can tell them apart.
How to organize your form with sectionsSections group related questions together. They're optional for short forms, but essential for longer ones — especially when you want to show or hide a whole group of questions conditionally.
How to set up conditional logic
Conditional rules show or hide questions and sections based on how a patient answers a previous question.
- Decide whether you're applying the rule to a single question or an entire section.
- Open the overflow menu on the question or section and select Add Rule.
- Set the rule type (e.g., "Show section when...").
- Choose the trigger question and the answer that activates the rule.
- Save.
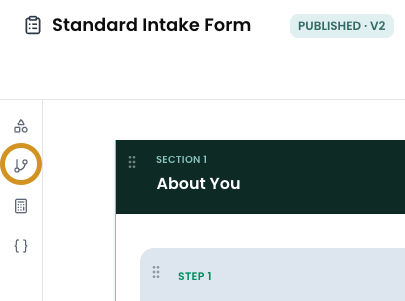
Example: Your form has a "Why are you seeking physical therapy?" dropdown. You create a hidden "Accident Details" section and add a rule: show this section when the answer is "Auto accident." Patients who select a different reason never see those questions.
Tip: Apply rules at the section level whenever possible. One rule on the section replaces individual rules on every question inside it.
When a rule is applied, a small icon appears in the builder so your team can tell which items have conditional logic.
How to collect documents from patients
- Add a File upload question to your form.
- Name it clearly (e.g., "Front of insurance card").
- Add help text with specific instructions (e.g., "Please upload a clear photo of the front of your card").
- Toggle Required on if you need the document to process the patient.
Tip for secondary/tertiary insurance: Add a yes/no question earlier in the form asking whether the patient has additional coverage. Use a conditional rule to show extra upload fields only when they answer yes.
How to add electronic signatures
Before you start: Your legal documents (HIPAA privacy notice, SMS consent, etc.) must be uploaded in Settings → Organization → Legal Documents.
- Add a Signature question to your form.
- In the settings panel, select which legal document the patient is signing.
Patients see a preview of the document with a button to read the full PDF, then a signature area where they can draw or type their name.
How to add validation rules
Under the advanced options for a question, you can restrict what patients are allowed to enter:
- Min / max length — control how short or long a response can be.
- Pattern (regex) — require a specific format.
- Custom error message — replace the generic "this field is required" with something that explains why (e.g., "A Social Security number is required because you indicated you were in an accident").
You can add multiple validation rules to the same field.
How to build a scoring formula
Scoring calculates a value from patient responses. For example, an administrative complexity score where auto accident patients with secondary insurance score higher than straightforward self-referrals, helping your team prioritize which intakes need more processing time.
- Make sure your questions have numerical values. Number fields work automatically. For dropdowns, assign a score to each answer option in the question's settings.
- Click Scoring on the left side of the builder.
- Enter a score name.
- Build a formula by selecting your scored questions and choosing operations (add, subtract, multiply, divide, percent).
- Click Try Values to test with hypothetical answers.
- Save.
Note: Scores appear at the bottom of the generated PDF after submission. They aren't visible while the patient fills out the form. There currently isn't a way to hide scores from the PDF.
How to control what appears in a Completed Intake in PDF format
When a patient submits a form, you can generate a PDF of their responses. Each question has PDF settings:
- Hide from PDF — don't include this question.
- Show only if answered — skip it if the patient left it blank.
- Full width — question takes the full page width.
- Page break before — start a new page before this question.
How to send a form to a patient
- From the Intakes list, click on the form to open it.
- Click Send Link at the top right of the Responses tab.
- Search for and select the patient.
- Optionally choose a case.
- Choose how to send: QR Code, Text, or Email. You can also copy the link directly.
Note: Each link is unique to that patient. Don't share the same link with multiple people.
After patients submit, their responses appear in the Responses tab with their name, form version, completion percentage, and submission date.
Tips and best practices
- Use sections to organize logically. Group related questions together: patient info, insurance, reason for visit, consent.
- Apply conditional rules at the section level. One rule on the section replaces individual rules on every question inside it.
- Preview before sending. Use the Preview tab to walk through the form as a patient would. You can also preview as a specific patient or lead to check how it looks with their information.
- Use help text and custom error messages. Clear instructions prevent support calls. Context-aware error messages reduce form abandonment.
- Use Collapse All / Expand All. These buttons at the top right of the builder make navigating long forms much easier.
Common questions
-
Why don't my question titles show up in the form?
By default, the form displays the step name, not individual question titles. This looks cleaner when you have one question per step. If you put multiple questions in a single step, click Add Label on each one so patients can see what each field is asking for.
-
When should I use sections?
Any time you have groups of related questions — especially when you want to show or hide the whole group conditionally. Short forms with a few questions may not need them.
-
Can patients see scores while filling out the form?
No. Scores only appear on the generated PDF after submission.
-
What's the difference between a number field and a text field?
A number field only accepts numerical input and can be used in scoring formulas. A text field accepts any characters. For alphanumeric values like insurance ID numbers, use a text field.