You add message and action steps (like emails, texts, delays, and branches) to create an automated sequence.
After you create a campaign, you’ll land here to build the workflow.
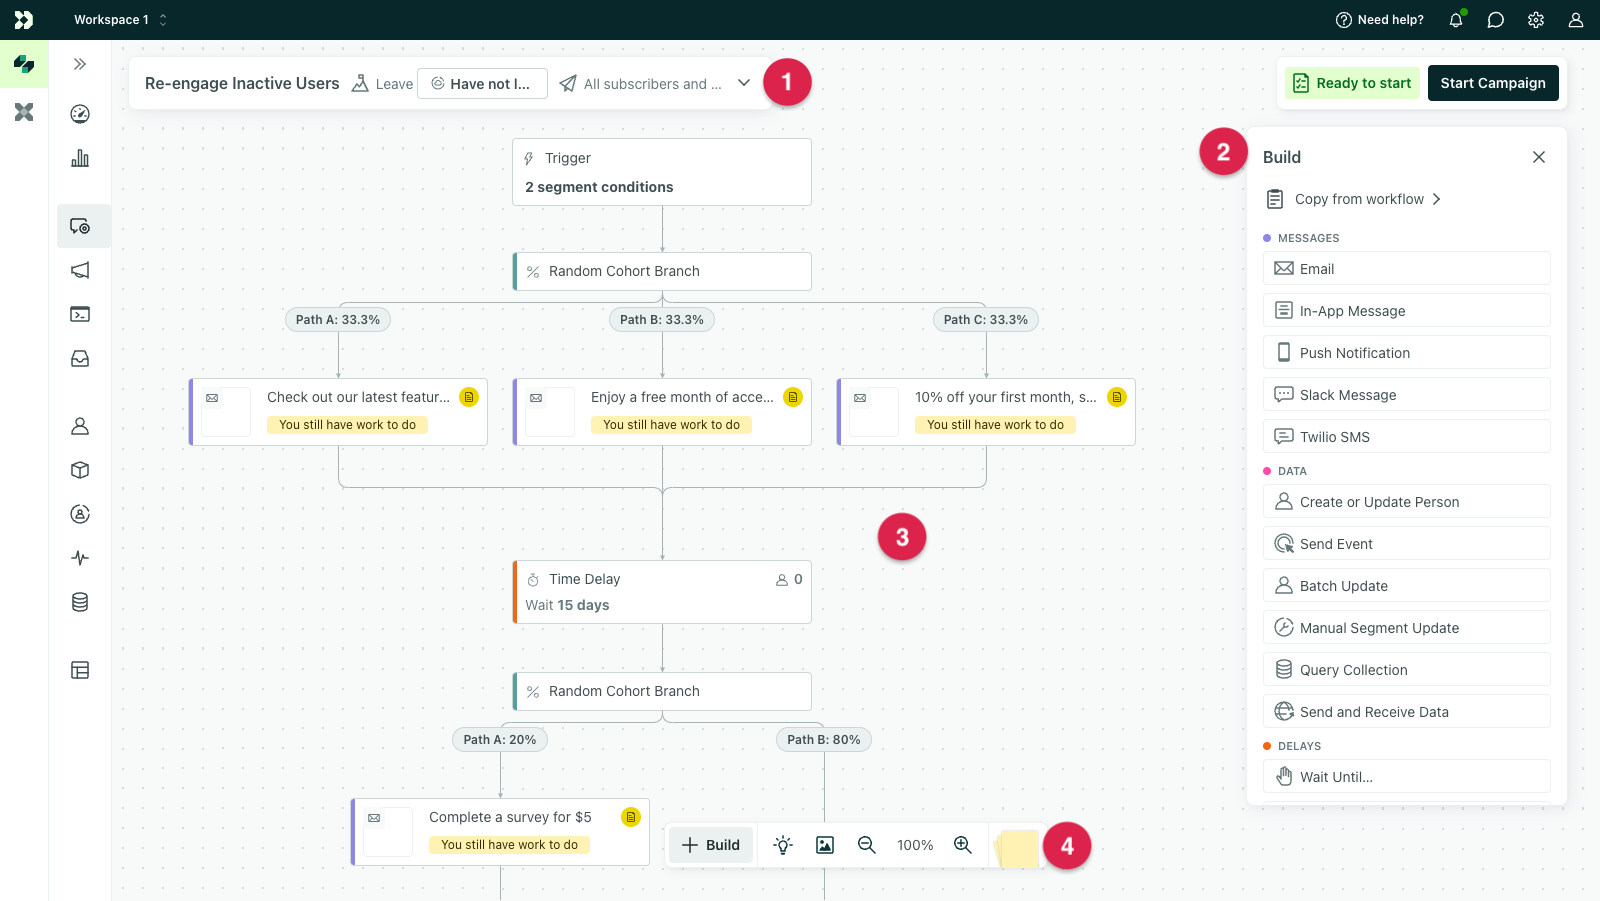
What You’ll See on the Screen
Most workflows have four areas:
-
Campaign settings: Update the campaign name, goal, exit rules, and message settings.
-
Build menu: The list of blocks you can add (messages, delays, actions, and branches).
-
Canvas: Where you drag and drop blocks to build the workflow (top to bottom).
-
Tools: Zoom, pan, add notes, export an image of the workflow, and view shortcuts.
How to Build a Workflow
-
Open the Build menu.
-
Drag a block onto the canvas.
-
Click the block to configure it.
-
Repeat until your workflow is complete.
Unconfigured blocks are marked so it’s easy to see what still needs attention.
Common Block Types
Message Blocks
Use these to send communication, such as:
-
Email
-
SMS
For each message block, you can:
-
Name the step (internal name)
-
Add content
-
Set sending behavior (draft vs automatic send)
-
Control unsubscribe behavior (use carefully)
Delay Blocks
Use delays to control timing between steps.
Common delay types include:
-
Time delay (wait X hours/days)
-
Time window (only send during certain hours/days)
-
Wait until (wait until a condition is met, with optional max wait time)
Flow Control (Branches)
Branches split people into different paths based on conditions.
Use branches when you need logic like:
-
If booked, stop messaging
-
If not booked, send a follow-up
-
If location is X, send message A; otherwise send message B
Data / Action Blocks
These blocks perform actions beyond sending messages, such as updating data fields or triggering actions.
Editing and Moving Blocks
-
Click a block to edit it.
-
Drag a block to move it to a new spot in the workflow.
-
Select multiple blocks to move or delete them together.
Tip: If your workflow is larger than your screen, you can pan around the canvas to navigate.
Notes and Collaboration
You can add sticky notes to your workflow to explain intent, logic, or reminders for teammates. This is useful for larger workflows or shared ownership.
Exporting Your Workflow
You can export the workflow as an image to share with teammates or stakeholders who don’t have access to Customer.io.
Best Practices
-
Build the workflow first, then write message content.
-
Use delays and time windows to avoid late-night sends.
-
Keep branches simple — add complexity only when needed.
-
Confirm sending behavior is set correctly before starting the campaign.